Monday, April 30, 2012

A New Milestone

I've reached a new milestone with my nails this month: new length record.  I started this blog one year ago because I was sick of having short ugly nails.  Nails that I would hide by always having my hands in lose fists.  Nails I would try to grow out with acrylics.  Nails that I were ashamed of.  Now I seriously cannot believe that my own natural nails are this long.

Last November I shared a "then and now" comparison shot of my nails.  The difference was startling to me.  I'd never had nails that went past the tips of my fingers before. And now...eight out of ten nails do.  It's astounding.

Today my nails look like this:
Right Hand*
Left Hand
To give you an idea of just how far I've really come, here is a progress collage:


I intended to do an update in January but lost track of time.  My nails are longer now, but I fear my left hand will always have stumpy nails.  This is just my theory, but these progress pictures are starting to offer compelling evidence that I'm going to have quite the struggle growing out two of the nails on my left hand: my middle and ring finger.

So why do I usually post pictures using my right hand as my model?  I'm not left handed, my nail art almost always looks better on my left hand than my right, but my left hand has problems from my nail biting days.  On my middle and ring finger of my left hand, the nail detaches from the nail bed on the side closest to my thumb.  The side closest to my thumb was always the area that sustained the most biting trauma based on its proximity to me, and my left was often subjected to more abuse because my right hand would be holding a pencil or mouse (and therefore spared from frequent biting).  The technical term for a nail detaching from the nail plate is called onycholysis and it's quite the bummer.  I always get tears at these corners and eventually what little growth I have will rip off.  I cannot count on my left hand being at a stable enough length to take pictures of, or even to match my right hand.  This month I found a product that has allowed me to grow my nails to this length and without this product my middle and ring finger would be as short as they are in the January picture.  The product is called ibd Brush-On Gel Resin and my review of the product will be coming soon.

I love that I have nails I never thought I'd have.  Trying to stop biting after a quarter of a century of doing it was not, is not, an easy task.  I still sometimes find myself engaging in bad habits but these instances are few and far between at this point.  To anyone out there who does struggle with nail biting: don't give up.  I've only been blogging for a year but I've been actively trying to quit for the last two and a half years.  Don't give up.

*I couldn't quite get the angle right to show off my true nail length; a fault of trying to fit my thumb into the photo.  To more accurately see the length of my nails check out this manicure.  

Sunday, April 29, 2012

Week 17: Earth Appreciation Manicure

The challenge for Week 17 of the 52 Week Challenge was an earth appreciation manicure.  I think there are a lot of different things you can do with an "earth appreciation" design.  Earth as the planet...trees...dessert...water...  I decided to pick a water theme because I'm all about water!  No really, I'm a water treatment engineer.  You have a water problem? Come talk to me.

These were my Earth Day nails:


For this manicure I tried to capture water on my nails.  I started with one quick coat of Zoya Kristen, then took a ripped up sponge and dabbed Zoya Jo across my entire nail and did the same with Sally Hansen Xtreme Wear White On.  The combination of these three nail polishes left me with a gauzy blue color that I think looks more sky-like than water-like.  Maybe next time I should add some green in?  I finished my manicure by stamping fish on my nails using M.A.S.H. plate m27 and Sally Hansen Xtreme Wear Black Out.  I can almost imagine that these fish are moving through the water, but I'm pretty sure they're just in the clouds above.

Be sure to check out what others have done for this challenge by visiting their blogs:
LizMarie at I'm Simply Complex • Jenna at I'm Still Thinking... • Caitlin at Addicted 2 Nails • Sarah at PrncessSarah02 • Charlotte at Charlotte's Nails :) • Shally at Polished & Not Quite Put Together • Rachel-Karina at Polished Criminails • Liz at Nothing But Nail Polish • Fun With My Nail Polish • Operation: Nail It! • Lauriestrodes Fun With Nails • Square Polish • Only Always Soccermom  • Hurr Did, Nails Did • Olivia Writes • The Dragon Lady • Kaki at Glitter Obsession • Isa at IsaBella's World • Gypsy at Gypsy's Glitter • Jackie at MeMa's Mani's  • Lissa at Lissa's Nail Blog  •  Marie at Polish, Polish, Polish...  • ChiChi at... •  Esra at Oje Sihirbazi (Wizard of Polish) •  Nails, Actually • Treselaine at Tres Chic Nails • Carol at Nails by Carol

Saturday, April 28, 2012

Bright Zebra

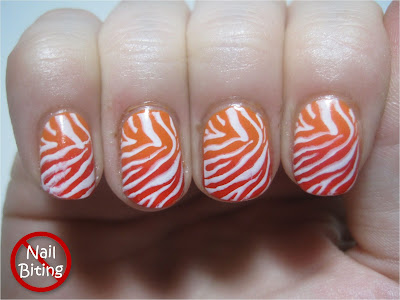
I guess I'm on an animal print kick these days!  Today I have a bright manicure I created last week.  I was feeling down in the dumps for no particular reason and didn't know what to paint on my nails. My natural instinct was pushing for neutrals and solid, dark colors...so I went with bright warm colors.


I painted my nails a base color of Zoya Jancyn then sponged Zoya Sooki on top.  I used four coats of Zoya Jancyn to get a fully opaque base.  What I should have done was use a white base before Jancyn so I wouldn't need so many coats!  Next I used a makeup sponge for sponging Zoya Sooki on top and then used Sally Hansen Insta-Dri Whirlwind White to stamp the zebra image from M.A.S.H. plate m57 on top.  The end result was very fun and bright.

Thursday, April 26, 2012

Taking a Walk on the Wild Side

Today I have a neat gradient plus stamping manicure to show you.  I've combined three of my favorite Zoya summer colors together and topped everything with sparkles and combination animal print stamp.  I've been admiring Zoya Wednesday since their promotional photos for the 2012 Beach and Surf Collection appeared on the internet.  Because I'm a sucker for punishment I held off on purchasing it; but finally it is mine!


For this manicure I painted my whole nail using Zoya Wednesday, a gorgeous green turquoise cream.  Then I sponged Zoya Mira over 2/3s of my nail.  Mira is what I think of when I think of the colors purple, not too dark but not too light.  On my tips I ended up using a stripe of Zoya Kieko, then sponged a little bit of it around to blend it (I couldn't get Kieko dark enough simply by sponging).  Because I'm in love with a little bit of sparkle, and I really think glitter ties everything together, I added a coat of Wet n Wild Wild Shine Kaleidoscope. Finally, I stamped M.A.S.H. plate m78 on top using Sally Hansen Xtreme Wear Black Out.  The final effect?  A pretty wild manicure for me to wear.  What do you think?

Tuesday, April 24, 2012

Mermaid's Dream

In March I won my first giveaway!  It was being held by Desirée of The Princess and the Polish and she was giving away a bottle of Deborah Lippmann's Mermaid's Dream.  When she emailed me to tell me I'd won I thought it was a mistake!  Happily, a mistake it was not and I received my very first Deborah Lippmann polish.


Deborah Lippmann's Mermaid's Dream is a beautiful sea foam green base with tiny specks of gold and small hexagonal blue glitters tossed in.  It applies fantastically, basically covers in one coat, and is only mildly top coat hungry.  It may look like scales here, but it was actually quite smooth after top coat.  I love this color and am very happy to have it!

Thank you Desireé!

Thursday, April 19, 2012

Leafing Rotterdam

I really had no idea what to title this post!  I've been trying to work my way through a pile of untried nail polishes I picked up this spring and came across OPI I Don't Give A Rotterdam!.  I Don't Give A Rotterdam is a nice dusty blue with subtle little specks of gold. The formula on this wasn't great though, it seemed streaky and it took three coats for me to get full coverage on my nails.


On top of I Don't Give A Rotterdam! I stamped the leaf image from Bundle Monster plate BM-210 using Sally Hansen Insta-Dri Brisk Blue.  The stamping effect is subtle and not noticeable from a distance, but I love the shimmer peaking through the leaves.

Sunday, April 15, 2012

Week 16: Dotticure

The challenge for Week 16 of the 52 Week Challenge was to create a dotticure - a manicure made out of dots.  I drew my inspiration for this manicure from two pins on my Pinterest board (here and here) and I'm pretty pleased with how it turned out.  I got a little carried away in the clean up process and ended up removing more than I should have but it wasn't noticeable from typical viewing distance.


I used Zoya Felicity as my base, than randomly added dots with Sally Hansen Insta-Dri Presto Pink, OPI A Grape Fit!, and Zoya Areej.


Be sure to check out what others have done for this challenge by visiting their blogs:
LizMarie at I'm Simply Complex • Jenna at I'm Still Thinking... • Caitlin at Addicted 2 Nails • Sarah at PrncessSarah02 • Charlotte at Charlotte's Nails :) • Shally at Polished & Not Quite Put Together • Rachel-Karina at Polished Criminails • Liz at Nothing But Nail Polish • Fun With My Nail Polish • Operation: Nail It! • Lauriestrodes Fun With Nails • Square Polish • Only Always Soccermom  • Hurr Did, Nails Did • Olivia Writes • The Dragon Lady • Kaki at Glitter Obsession • Isa at IsaBella's World • Gypsy at Gypsy's Glitter • Jackie at MeMa's Mani's  • Lissa at Lissa's Nail Blog  •  Marie at Polish, Polish, Polish...  • ChiChi at... •  Esra at Oje Sihirbazi (Wizard of Polish) •  Nails, Actually • Treselaine at Tres Chic Nails • Carol at Nails by Carol

Friday, April 13, 2012

Week 15: Easter Day Manicure

The challenge for Week 15 of the 52 Week Challenge was to create an Easter Day manicure.  So far I've done chickens, sheep, and a pastel water marble.  I felt like that left me with two choices for today: eggs or bunnies.  To add diversity I decided to go with eggs, and I'm rather wishing I'd done bunnies because maybe that would have been easier!  Also, do you know what sound bunnies make?


The polishes I used were (in order of which they appear): Essie A Crewed InterestZoya Areej, Zoya Snow WhiteEssie Turquoise & CaicaosZoya BreeziOrly Lucky DuckyEssie Bangle JangleChina Glaze Electric Beat,  and Sally Hansen Mellow Yellow.

It's come to my attention that I'm missing participants in my "other challenge participants" list.  If I'm missing you, please let me know by commenting and leave a link to your blog.  I'll add you to the list!  Conversely, if I've got your name listed and you're no longer participating, please let me know.

Be sure to check out what others have done for this challenge by visiting their blogs:
LizMarie at I'm Simply Complex • Jenna at I'm Still Thinking... • Caitlin at Addicted 2 Nails • Sarah at PrncessSarah02 • Charlotte at Charlotte's Nails :) • Shally at Polished & Not Quite Put Together • Rachel-Karina at Polished Criminails • Liz at Nothing But Nail Polish • Fun With My Nail Polish • Operation: Nail It! • Lauriestrodes Fun With Nails • Square Polish • Only Always Soccermom  • Hurr Did, Nails Did • Olivia Writes • The Dragon Lady • Kaki at Glitter Obsession • Isa at IsaBella's World • Gypsy at Gypsy's Glitter • Jackie at MeMa's Mani's  • Lissa at Lissa's Nail Blog  •  Marie at Polish, Polish, Polish...  • ChiChi at... •  Esra at Oje Sihirbazi (Wizard of Polish) •  Nails, Actually Treselaine at Tres Chic Nails Carol at Nails by Carol

Saturday, April 7, 2012

Pastel Water Marble

Going hand in hand with adorable baby animals for spring is an excessive use of pastel colors!  I love water marbling and wish I was better at it, so this was the perfect opportunity to try out some new polishes I acquired and get more practice.  I think it turned out really awesome.


The colors I used were OPI Did You 'Ear About Van Gogh?, Essie Turquoise & Caicos, and Essie Bangle Jangle.  I never want to take the chance that a polish I'm using will be so thin on my nail that the color won't be opaque so I always paint my nail with a base of white polish.  For this water marble I painted my nails with a single, super thin and streaky coat of Zoya Snow White.  I also love a little glitter, so I topped everything with a thin coat of China Glaze Fairy Dust.

Thursday, April 5, 2012

Baaa! Baaa!

Keeping with the Easter/adorable animal theme, today I present to you little sheep.  The design for these sheep are based off of Chalkboard Nail's sheep tutorial and are super cute.  I just love their little sparkly pink noses!


For my base color I used two coats of Orly Lucky Duck, the sheep body is Sally Hansen Insta-Dri Whirlwind White, the eyes and legs are Sally Hansen Xtreme Wear Black Out, the ears are China Glaze Pelican Gray, and the nose is Zoya Happi.

Tuesday, April 3, 2012

Cheep! Cheep! Cheep!

Easter is coming up and I'm having a lot of fun creating Easter/Spring themed nails!  I love baby animals and I'm really digging soft shades.  To create these adorable baby chicks, I used this tutorial from I Have A Cupcake.


I used a foundation of Zoya Snow White (to make the yellow pop) and two coats of Finger Paints Art Nouv-Yellow.  Finger Paints Art Nouv-Yellow is my most hated nail polish because every time I use it my nails are stained yellow.  But it's one of two yellows in my collection and I wanted to use a yellow with more of a metallic yellow for this design.  For the rest of the chicken I used Sally Hansen Xtreme Wear Black Out, Zoya Snow White, and Zoya Jancyn.

Are you doing any Easter nails?

Sunday, April 1, 2012

Week 14: Striped Manicure

The challenge for Week 14 of the 52 Week Challenge was to complete a striped manicure.  For this manicure I went with a simple vertical stripe design.


To create this manicure, I alternated stripes of Zoya Happi, OPI Are We There Yet?, and China Glaze Strawberry Fields on top of a single-coat white base of Zoya Snow White.  Zoya Happi was quite thin and needed a second stripe to reach full opacity.  I finished with a thin coat of China Glaze Fairy Dust.  I like how complimentary the pinks are of each other, and how the Fairy Dust provides some cohesion of the colors.

Be sure to check out what others have done for this challenge by visiting their blogs:

LinkWithin

Related Posts Plugin for WordPress, Blogger...