 |
| My old, no light box required, easily hides away, photo setup. |
It worked fantastically, until one day the light just wouldn't turn on. Of course it died in the beginning of December, when the days were getting shorter and shorter. Alas. Fortunately I've been dreaming, planning, plotting, and designing a more permanent light box since last June. Not as fortunate that I didn't have a large back-log of nail photos that I could share with you.
It was time to build.
I began to gather supplies, and please forgive me ahead of time, I don't have much practice with taking photos throughout a project but I did try my best. I knew I wanted my light box to be made out of wood: I wanted a sturdy set up. Also I think my cat would try to sleep in it if I made it out of cardboard. I knew I wanted a light fabric shell to diffuse the light. I knew I didn't want lighting that was specific to one company. I also live in a one bedroom apartment so all the construction must be able to be completed in my kitchen, no fancy cuts on a miter saw.
I started with two, half-inch 12" x 12" pieces of plywood for my base. I wanted to screw the pieces together but my drill isn't strong enough to drill through wood (go figure). I used wood glue and fashioned them into an L.
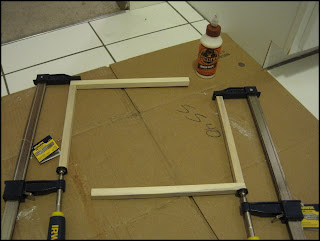
The next step was to create two frames for the fabric. I made the frames out of four, 5/8" square dowels. They came 36" in length and I cut them down to size with a little utility saw and a miter box.
This stage completed I lugged everything down to my garage parking spot in the basement and sprayed the plywood base and frames with two coats of primer. I used primer because I wanted to seal the wood and create a base for paint to cover over.
On top of the primer I applied a coat of white acrylic paint. I wanted to make sure that everything was a nice white color in order to reflect the light as best as possible.
Next step was to make the cross-bracing to attach the fabric to. I had to sand away some areas I had already painted because I quickly learned that if you try to use wood glue on painted surfaces it won't adhere together. Tip: don't paint until everything is glued together. Wood glue doesn't stick very well to painted surfaces.
Almost ready! It was time to attach the fabric to the frame that I'd made. I bought a yard of bleached muslin cloth at a fabric store to affix to the sides. I cut it like I was wrapping a present and used little nails to attach the fabric to the dowels.
With the frame wrapped, the finishing touches for the light box were fairly easy to complete. I glued a large piece of felt to the bottom of the plywood to prevent scratching of the surface that the box would sit on. I sat the frame on top of the box and used my leftover fabric to create a seamless background (I still need to iron the fabric). Then I placed a bookend on either side of the box and attached the lights with day light bulbs.
Here's what it looked like in the end all lit up:
Looks like a legit light box now. :) I'm really happy with how it turned out. I know what you're probably most interested in seeing is how things photograph inside the light box. I'm happy to report that they photograph really well! This is a photo of a cat I picked up in China last year:
Happy, well-lit cat. I do need to pick up a third light to shine down from the top and
Here's the budget breakdown for this project:
- Plywood: $3.00
- Square Dowels: $8.56 (at $2.14 per dowel)
- Gorilla Glue: $3.83
- Primer: already had
- Paint: $0.89
- Fabric: $1.99
- Nails: already had
- Felt: $0.68
- Bookends: $11.49
- Lights: $20.91 (at $6.97 per light)
- Day light bulbs: $2.98 (at $0.99 per bulb)
- TOTAL: $46.37
 |
| Project Manager Delilah |
The one thing I did leave out were all the photos that my cat bombed. She was the project manager for this endeavor and kept close taps throughout all stages of the construction.
In fact, all photos would look like the one on the right if I didn't hold her in my lap when taking photos.
Happy polishing!


How cool! I want a lightbox too so it's cool to see how you did this one - I'm glad you included the project manager. They can get kind of huffy if you don't share the glory ;)
ReplyDeleteVery huffy is right! Especially when they think they can take a nap in the finished product.
DeleteLooks great! My current set-up is like your old one or with a piece of white paper in front of a window. I've got a cardboard box set aside; I just need to find project time.
ReplyDeleteI'd like to see it when you get done!
Delete